Getting started
SpecSync for TFS synchronizes the scenarios of a SpecFlow project with the test cases of a TFS/VSTS project. To setup this, SpecSync has to be installed to the project via NuGet or by downloading the synchronization tool. Once the setup has been completed, the synchronization can be invoked by executing the installed command line tool, specsync4mtm.exe.
This chapter goes through the setup and the synchronization steps for SpecFlow projects. For non-SpecFlow projects, like Cucumber, please check page Using SpecSync with Cucumber.
You can also watch the "Getting started" video at https://youtu.be/uhZH81sMMfs.
Preparation
For setting up SpecSync for TFS, you need a SpecFlow project and a TFS or VSTS project. Both should match the SpecSync for TFS prerequisites.
In our guide, we will use a calculator example (MyCalculator) that uses SpecFlow v2.1 with MsTest. The SpecFlow project is called MyCalculator.Specs. For a synchronization target we use a VSTS project: https://specsyncdemo.visualstudio.com/MyCalculator. (A VSTS project for testing SpecSync can be created for free from the VSTS website).
Installation
SpecSync for TFS can be installed by adding the SpecSync.MTM package from NuGet.org:
PM> Install-Package SpecSync.MTM
The package configures SpecFlow for SpecSync (registers the SpecSync SpecFlow plugin). It also adds a specsync4mtm.cmd script file to the project for calling the SpecSync command line tool conveniently.
First synchronization
- Make sure your project compiles.
- We recommend starting from a state where
- all tests pass,
- the modified files are checked in to source control.
- Open a command line prompt and navigate to the SpecFlow project folder (
MyCalculator\MyCalculator.Specs) - Call
specsync4mtm.cmdwithout any parameter first, you should see a list of the possible command line options. - Now call
specsync4mtm.cmdwith specifying the TFS/VSTS project URL in the --tfsUrl parameterspecsync4mtm.cmd --tfsUrl https://specsyncdemo.visualstudio.com/MyCalculator - An authentication dialog will popup, where you have to specify your credentials for accessing the TFS/VSTS project. (The popup can be avoided by specifying the
--userparameter. See TFS/VSTS authentication options for details.)
As a result, the scenarios from the project will be linked to newly created TFS test cases, and you will see a result like this.
Loaded 1 feature files from project 'MyCalculator.Specs.csproj'.
Processing feature file: Features\Addition.feature
Add two numbers linked to test case #1810
Add two numbers (outline) linked to test case #1811
Note: Scenario tags are synchronized to test case tags; Scenario Outlines are synchronized to parametrized test cases.
Check Test Case in TFS
Find one of the created test case in TFS. The easiest way to do this is to open the TFS/VSTS URL in a browser and specify the test case ID (e.g. #1810) in the "search work item" text box in the upper right corner of the web page.
You should see something like this.
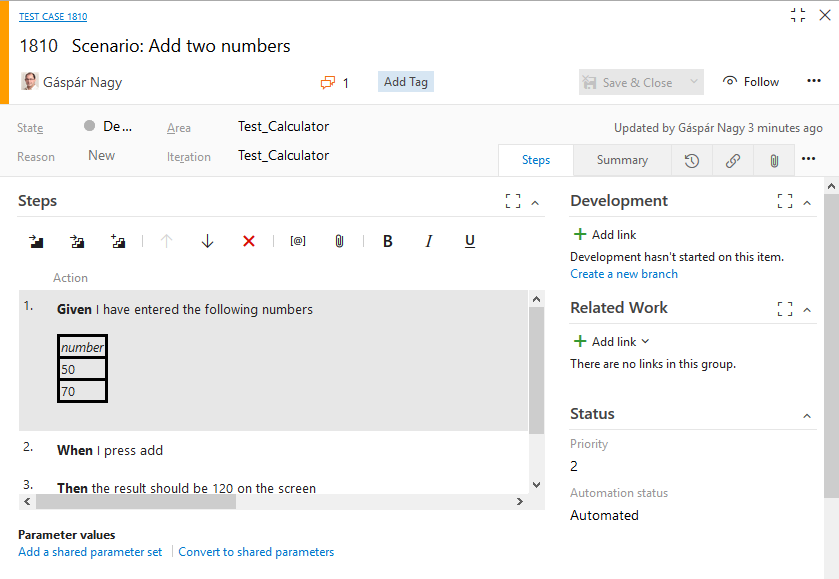
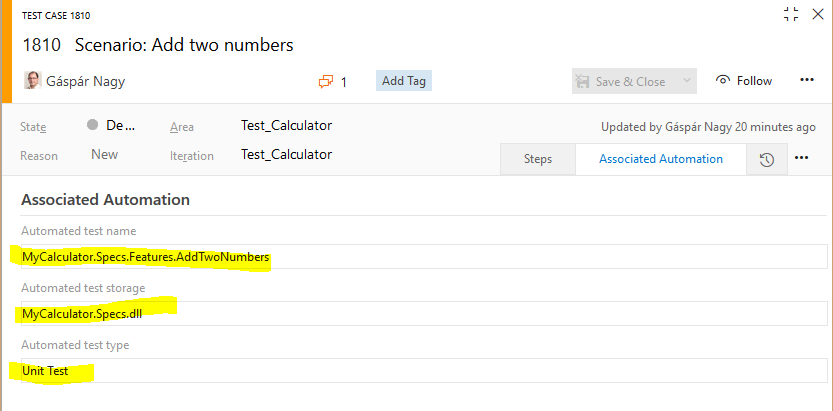
The automation status of the created test cases is set to Automated. If you switch to the "Associated Automation" tab, you can see that SpecSync associated the generated SpecFlow test method to the created test case.
If your project is already configured to automated test case execution, you can already configure a test run and execute the new test case. (For that, you have to add the test case to a test suite. SpecSync can also do that with the --testSuite parameter. More details below.)
Note: Scenarios marked with special tags (or all) can be also synchronized to Not Automated test cases. For this, you have to specify the tags for the --skipAutomation parameter.
Verify feature file and commit changes
Open one of the feature files from the SpecFlow project in Visual Studio. SpecSync modified the file and added a few tags:
- The feature header has been tagged with a
@tfs:...tag specifying the TFS/VSTS URL:@tfs:https://specsyncdemo.visualstudio.com/MyCalculator Feature: Addition - Each scenario and scenario outline has been tagged with a
@tc:...tag making the link between the scenario and the created test case.@tc:1810 Scenario: Add two numbers
Note: The feature files are changed only when synchronizing new scenarios. To avoid file changes (e.g. when running the synchronization from a build server) the --buildServerMode switch can be used. See Synchronizing test cases from build for details.
Verify if the project still compiles and the tests run (they should, since we have only added tags), and commit (check-in) your changes.
Synchronize an update
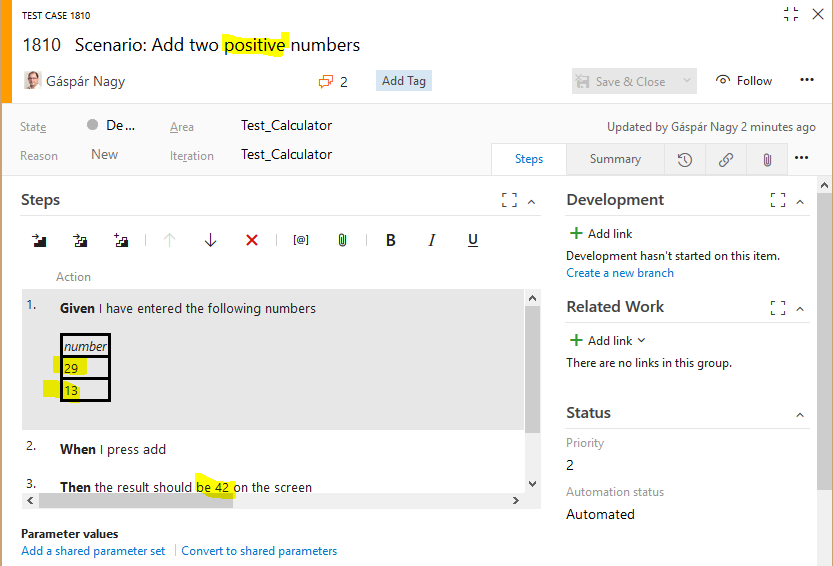
Now let's make a change in one of the scenarios and synchronize the changes to the related test case.
Update the title and the steps of the scenario, for example to this:
@tc:1810
Scenario: Add two positive numbers
 Given I have entered the following numbers
     | number |
     | 29     |
     | 13     |
 When I press add
 Then the result should be 42 on the screen
Make sure it still compiles and the test passes.
Run the synchronization again:
specsync4mtm.cmd --tfsUrl https://specsyncdemo.visualstudio.com/MyCalculator
The result shows that the test case for the scenario has been updated, but the other test cases have remained unchanged:
Loaded 1 feature files from project 'MyCalculator.Specs.csproj'.
Processing feature file: Features\Addition.feature
test case #1810 updated from scenario Add two positive numbers
test case #1811 is up-to-date with scenario Add two numbers (outline)
If you refresh the test case in your browser, you should see the changed title and steps.
Note: For executing complex test cases, further verification and planning steps might be required after the test case has been changed. SpecSync can reset the test case state to a value (e.g. Design) in order to ensure that these steps are not forgotten. For this, use the --modifiedState parameter.
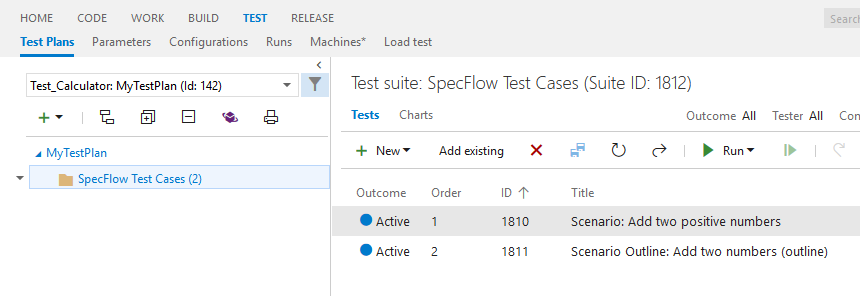
Group synchronized test cases to a test suite
We have seen already how to synchronize scenarios to test cases. To be able to execute these test cases in TFS, they have to be added to test suites. SpecSync can automatically add/remove the synchronized test cases to a test suite. For this you have to specify the name or the ID of the test suite in the --testSuite parameter as the following example shows.
- Make sure that the project compiles and the tests pass.
- To synchornize the test cases to a test suite called "SpecFlow Test Cases", run the synchronization again wiht the
--testSuiteparameter.specsync4mtm.cmd --tfsUrl https://specsyncdemo.visualstudio.com/MyCalculator --testSuite "SpecFlow Test Cases"
The synchronization will proceed with the result similar to this:
Test Suite #1812 'SpecFlow Test Cases' loaded with 0 test cases
Processing feature file: Features\Addition.feature
test case #1810 is up-to-date with scenario Add two positive numbers
test case #1811 is up-to-date with scenario Add two numbers (outline)
Adding 2 test cases to test suite 'SpecFlow Test Cases'
Since there has been no test suite with this name yet, SpecSync has created a test suite (under the first test plan) and included the two test cases in it. (You can add test cases to many test suites.)
Note: Since the test suite names are not unique in TFS, you can also specify the test suite ID for the --testSuite parameter, e.g. --testSuite #1812.